PropBlur Painting Technique

by Gary Barling excerpts from an email to site owner
Copyright 2011, reprinted by permission of the author
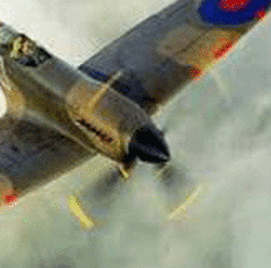
"As for my painting technique, the picture at left
is as good an illustration as any." *
You can see how the only really defined portion of the blade is the part nearest the spinner, and that's already blurred even though that's the part of the blade that moves slowest. As you progress outwards, the blade becomes fainter and less well-defined because it's moving faster and faster the closer to the tip you get.
The yellow tip, while visible, is pale and "washed out" because that is the part of the blade moving fastest. This is the overall effect I try to obtain. Here's what I did on a recent build, a Lockheed Hudson from 407 (Coastal Strike) Sqn, RCAF, 1942, using PropBlurs: (PropBlur note: a picture of Gary's model is in our online gallery, or to view in its native location, click the picture)
a. Prime the blades with a light grey.
b. Using a very thin solution of black, at least in the order of three or four parts thinner to one part paint (I use tire black or grimy black…anything other than pure matt black: it's too black!), very lightly airbrush the blades from spinner to tips. Take your time, applying just a haze of black nearest the spinner end, then slowly working out to the tip. Best to move the airbrush across the blade rather than along it as you build up the colour, so you get a sense of the prop movement. (Note the blade in front of the right wing. You can see what appears to be transverse black stripes across the blade). Build up the colour rather than try to apply it all at once. The idea is to get a smooth fading gradation from the spinner to the tip. One of the beauties of PropBlurs is that they're metal: if you mess up the painting for whatever reason, you can remove the paint and start again with no damage to the blades.
c. With the black completed, mask off the black and apply the yellow tips, again applying a very thin mix of yellow. As noted, it should be faint, washed out, but clearly visible as a colour. Compare the yellow of the prop tips in the photo with the yellow in the fuselage roundel to see what I mean. The roundel is a pretty solid colour, while the prop tips (especially the one just forward of the left wing) is a faint and washed out blur.
And that's all there is to that. Fit the blades as per instructions, sit back, and admire your handiwork! I'm not so arrogant as to claim that this is the "be all and end all" of PropBlur painting, but it is, I think, a step in the right direction. Feel free to put the method up on your website if you feel that it will help other modellers. If you or any others have questions, please contact me at my email address. Don't be shy of using it!
Best Regards, Gary Barling (PropBlur customer)
Ontario, Canada [email protected] IPMS Ottawa
*For an accurate look at colors referred to in this article, we suggest you view the picture above on its native location, so it will show you better rendering of the colors, including colors on the fuselage roundel. Credit: At time of this writing, 9/3/2011, photo by Gary Barling above is at this URL: http://www.google.ca/imgres